|
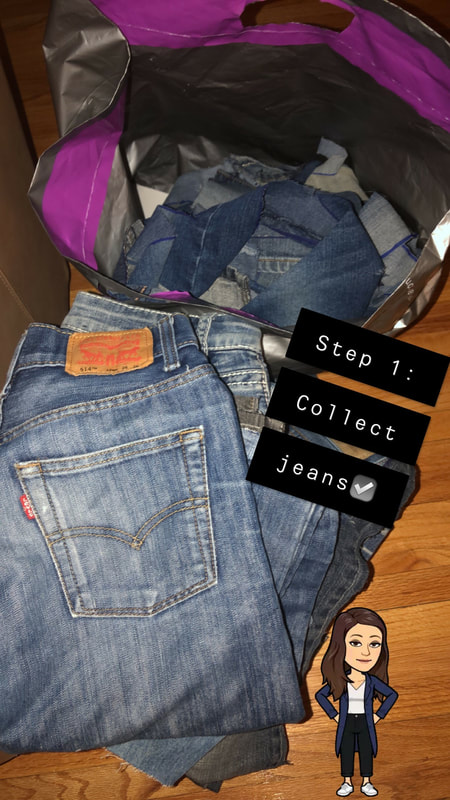
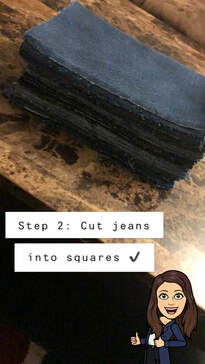
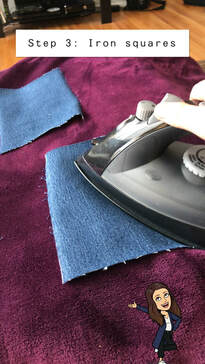
This week my learning project is beginning to finally take off. I have finally begun taking the steps to making a blanket as a final project. I got my hands on a sewing machine and read through the instruction manual, as well as reviewed the sewing machine instructions/videos that I talked about in last week's blog post. I decided on creating a jean quilt which I am hoping to use as a beach blanket as summer is fast approaching. I received many great tips after reading a blog called "How to Make a Gorgeous Denim Quilt from Blue Jeans". I also used the instructions provided by Instructables. I then decided to create my own steps with pictures (with my Bitmoji of course) to help me keep track of my progress, but also to help anyone else out who might want to try this some day. Step 1: Collect Jeans = Lucky for me, my mother had three boxes filled with old jeans. My strategy was to pick the lightest jean material. Since this will be a beach blanket and will be carried to the beach, I want it to be as light as possible. So all the thicker material jeans went in the no pile. After that, I tried to focus on colours - what kind of schemes I wanted. This was a little harder as the jeans came in all different shapes or sizes, so for many of them I did not know how many squares I could get out of each pair of jeans. Step 2: Cut the jeans into squares = this took me almost three hours to do. I might just be slow, but it took forever to figure out what size I wanted the squares (they are rectangles in my case) and then actually cut them. My thumb felt bruised after doing this from the constant pressure of the scissors. But it was all worth it because I got my squares. I forgot to take a picture of them all laid out so I'll post a picture of my pattern next week. Step 3: Iron the squares = this is important because after cutting them, they are folding all over the place so this is a crucial step to making sewing them together easier. The trick is to not use steam as with jeans, they will become more damp and that makes them harder to deal with as they do not dry as fast. Simply iron over the squares a few times and they are good to go.
This week has gotten me so much more excited for my blanket now that I can see it is beginning to come together. These may seem like three small steps, but they took quite a bit of effort. I am very excited to see how my blanket turns out and a little scared to start sewing, but more excited!
1 Comment
As I mentioned in my last post, this is not going to be a very exciting week to blog about, but bear with me. Next week, I will have a sewing machine: I am a poor student who begged my mom to let me use hers so I will finally get a hold of it next week. That means this week is all about preparation. How do I use a sewing machine? That is my biggest question as of now. I used one back in grade 10 I think so it has been a while. In order to learn how a sewing machine works, I researched by watching many videos - click link 1 and link 2 for the ones I used most. I also used this blog called Crazy Little Projects which had lots of useful tips for people who are just learning to sew. I never knew that there were so many things to consider when buying and looking at a sewing machine - a little relived I get to use my mom's because not only are they pricey, but the differences between them are so hard to see for beginners so this makes my life easier. My next step was to decide on my final project - a blanket. I still have not decided on whether it will be a fleece blanket, a quilt or a jean quilt (My grandma makes jean quilts and they are beautiful so very tempted to try that - story and pictures at the bottom). I decided to research all three and I will keep you posted on what I decided to do. I will most likely decide once I actually get my hands on a sewing machine and see how easy or difficult it is to use. Either way, I'm excited that at the end, I will have a nice blanket to cuddle up with. My next question was what materials am I going to need to make a blanket: -Sewing Machine = Still Need -Thread = Yes -Fabric Scissors = Still Need -Pins = Yes -Needles =Yes -Fabric = Still Need -Measuring Tape = Yes And I think that it is! So there are just a few things on my list that I still need to grab which shouldn't be too difficult. I am weirdly excited to go to the fabric store. Although I have never had to go there, I am very excited to look around and get to choose my material, colours and patterns. Story Time: My grandma (or as I call her, Memere - I come from a French family) is a sewing genius in my personal and totally unbiased opinion. She has sixteen grandchildren, including me and as a graduation from High School gift, she makes each one of her grandchildren a jean quilt. She uses old jeans and cuts them up into squares and carefully picks out patterns for the inside of each grandchild's blanket that she feels they will like.
These blankets take months to make and as she gets older, they take her more time to do, but she continues making them. Her dedication and patience is amazing to me and I think she is such a talented person. This blanket, that she crafted for me four years ago is one of my most special possessions - it was made by one of my favourite people, she put so much thought and effort into it and it is the warmest blanket I own. So this is a picture of the blanket she made for me and possibly what I may attempt though if I do choose to do something like this it will be smaller and the squares will be bigger. Anyway that is the end of my story, I thought I would share who my sewing inspiration is and show you how amazing her work is! That is all I have to report for today's blog! Hopefully I will have some pictures of the beginning of my blanket in the coming weeks! So this week was a little less exciting. I decided to focus on how to sew add-ons like buttons, patches and zippers. I will not be using any of these things in my final project which is why I wasn't sure whether I should bother, but I decided that it would be a useful skill to be able to resew on buttons or fix a zipper. I started with buttons - I bought a package of purple buttons and I had no idea what to use them for as I had nothing that was in need of buttons! I decided to simply sew them into a random piece of fabric for practice anyway. I used Wiki How and followed the instructions provided. It was very helpful because the site gave me options and instructions for sewing on a two-hole button or a four-hole button. I also tried a few different things so the picture at the bottom only shows two out of my many attempts. I decided to sew on one of each and voila: two nicely sewn on buttons on random fabric! As a student, I am on a budget which is a big problem so instead of buying patches and zippers, I made do with what I had. I watched a video on how to sew on a patch and practised with a random piece of fabric on another. Although it is much different without a patch, I think I mostly go the gist of it. I started watching some videos on how to sew on a zipper, but quickly realised that it was super difficult without a sewing machine. As I mentioned before, I am a poor student so my mother said I could borrow her machine, but I will not get that until next week so unfortunately I was unable to try a zipper. This week was pretty tame, but as the weeks go on, I will be putting much more time and effort as I begin to make a blanket! It never hurts to pick up some other random skills along the way!! 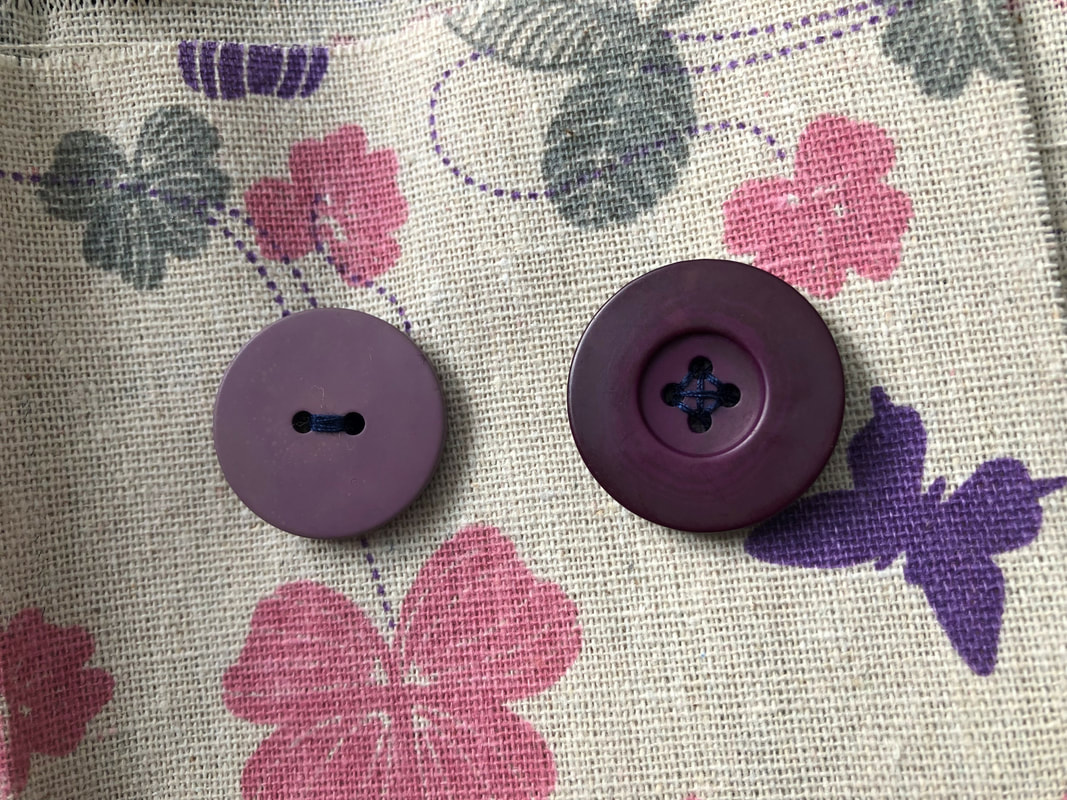 |
AuthorHillary Mercier is a 4th Year Student at the University of Regina. She is currently studying to be a High School English teacher. Archives
April 2019
Categories |
 RSS Feed
