|
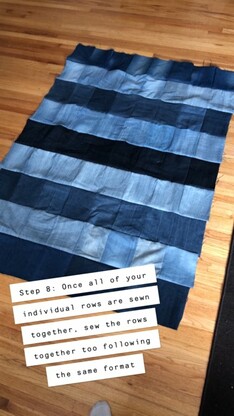
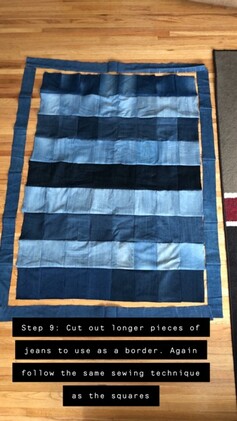
Well if you came here this week to learn how to sew, join the club. In all seriousness, I can probably teach you a thing or two if you are new to sewing, but if you have any experience in it, then you probably have an idea of what do to already. This week came with its own trials as usual. DARN BOBBIN. For some reason, my bobbin hates me and makes me life a living nightmare! 1. My needle was not picking up my bobbin 2. The thread through my needle came out 3. I realised my bobbin was out of thread 4. I struggled to re-thread it, tried it again 5. It kept getting caught in the sewing needle and denim fabric: I was confused and frustrated as to why it wasn't working 6. I looked at the thread, realised it probably was not wound up tight enough 7. Grabbed a new bobbin, re-threaded it and eventually got it back in my machine. You see now why I may not be the best person to take sewing advice from ... But I am trying my best, just some minor inconveniences that made this week a lot more stressful than it needed to be. In trying to figure out what I was doing wrong, I started searching the internet and realised this is a pretty common problem - I watched a YouTube Video: "Sewing Machine Problems: Thread Bunching On Underside Of Fabric & Unjamming" which was super helpful in helping me see the different causes of the jamming. I also read a Q & A site to find out reasons why my thread might be coming out of my needle which was very helpful too - I still have not solved the problem fully, but it seems to do it less when I tightened the tension on my thread! On the bright side, I FINALLY got all my squares put together which completes Step 8 of my process (which I have been documenting in picture form - Pic 1). I love the way it look so far! This also caused me a few headaches, as I am not good at cutting straight lines. For some reason, my lines start straight, but never end that way. I did search online for what type of sewing tools would help me cut straighter, but I was not willing to spend the money. If I decide to pick this up as a hobby outside of class, I will for sure spend a little money on some of the tools. Anyway, sewing some of these pieces together were increasingly difficult due to them being crooked and caused a lot of frustration. This is also why my blanket so far is a little crooked, but oh well. After getting the squares all attached, I had to work on getting a border for the blanket. I had planned to do this and sew them on, but these four borders took me hours to get right and they still aren't straight! But, I cut up some longer pieces of denim and then sewed them together until they were the length I needed (Pic 2). Next week, I will finally get those on and the front of my blanket (and the hard part of my blanket) will be complete!!!
This week, we were also asked to share our learning with our fellow classmates. I created a how-to video/vlog. I walk you through the steps of creating a denim quilt by starting with sewing the squares together. I decided to show this part in the video for two reasons: 1) That was where I was at in my learning so it made the most sense and 2) This was a step that I struggled with a lot at the beginning, but got the hang of it the more I practised and worked on it so I thought it would be an important and helpful step to show all of you! The video can be found directly below and feel free to leave me any comments or feedback! Thanks for checking in this week!
2 Comments
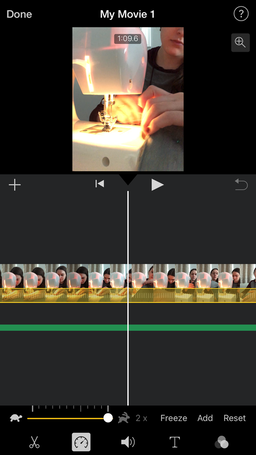
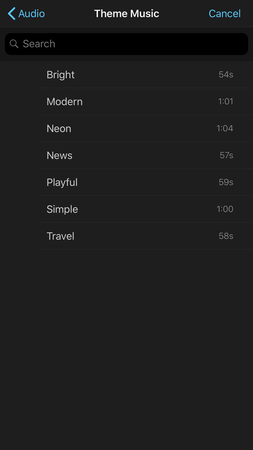
This week we were asked to find a tool that we have never used before. As you can probably guess from my title, I decided to try time lapse. It is something I have heard about many times and thought about using, but never got around to actually trying it out. Overview of the tool: I really enjoyed doing a time lapse! I had a few problems at the start. I used the iPhone Camera App where they have a Time Lapse option. After a few takes, I discovered that the video was moving way too fast that I could not even tell what was going on. I tried to look for ways to slow it down, but struggled so I headed out to Twitter and asked for help on there. My mentor, Jayden gave me some great advice which was to try iMovie. Thanks Jayden! Once I was accustomed to how iMovie works (I've used it before, but it was a while ago), I got the hang of it and was ready to go. It is pretty easy to use. I uploaded my video and if you click on the strip of video, it will be surrounded in a yellow lining. Then if you hit the little timer button at the bottom of the page, a little scale with a a turtle and a rabbit will show up (Figure 1). Simply move the line to the speed you want and VOILA! I also wanted to add in some generic music to make it a little more entertaining to watch. In order to avoid any sort of copyright, I figured it would be easier to see what iMovie had to offer. Once your video strip is clicked, you can click on the plus sign (+) in the left hand corner. Then click audio, and then I clicked Theme Music. After that, I just listened to a few until I found one that fit. I decided on Modern and then it just added itself (Figure 2). I could play with the sound if I wanted to but it fit the video perfectly so I left it as it is. Overall I highly recommend time lapses as they are super convenient and easy especially if you have a long video you want to show, but can't afford that large amount of time. IMovie was super easy to use and I recommend it to anyone in need of a video/movie source for a project!
I was hoping to get through sewing all my rows together, but it took me longer than expected so I have a few more to go and then finally I can work on sewing them all together. So far I think it is going pretty good, I get excited every time I finish a row because I can slowly see it is coming together nicely! Everything is pretty much the same as last week as I'm just trying to get these rows done. Below is my time lapse video of this week's sewing so please watch it and feel free to give me any feedback! Thank you for reading and watching! Stay tuned next week for a full look at he top layer of my blanket!
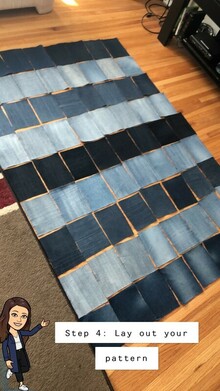
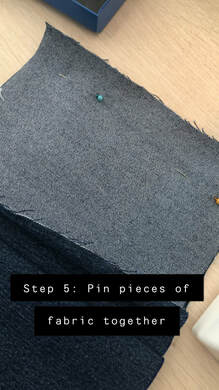
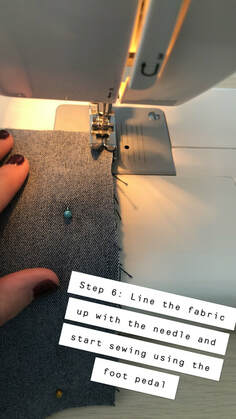
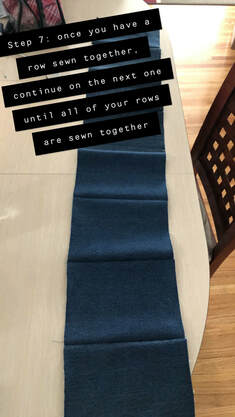
I finally got my sewing machine working this week and started sewing together my jean squares for my blanket. This took me way too many hours, I kept running into problems. I can confidently say, "I think I got the hang of it" by the end of the day. I pulled out my sewing machine and the manual and began setting up my sewing machine for work. Everything was working out fine, until I got to the part about a bobbin. A) What is a bobbin B) I don't have a bobbin and C) Where does the bobbin go and how is it used. I searched the manual from cover to cover and it gave me little to no information on the bobbin. So I resorted to Google and Youtube. I found out what a bobbin is and I linked it in case you are curious. And then I watched this video on how to insert a bobbin into the machine (SUPER helpful). So I ran out to Walmart (AGAIN - I've done probably 4 different trips already this week). I bought some plastic bobbins. And then followed the instructions of the video to put it into the machine. Finally, things were starting to come together. Things were moving slow when I first started and I was having trouble with how much space to leave between my seam and the edge of the square. This video was super helpful in giving me the right dimensions and providing me with a visual on how I should be doing it. Once I finally started to get the hang of it, things were moving at a nice pace, but a new problem occurred. I found my main thread kept pulling out of the needle. It was very odd because it wouldn't happen all the time, just at random times. And I wouldn't even notice it until I started doing my next square and no thread would come out. I have just learnt to deal with it as I really don't know what I can do to stop it - I guess just have to keep a better eye on it while sewing. I googles it, but did not get any helpful responses. If anyone knows how to avoid that, feel free to let me know! After all these minor inconveniences, everything went smoothly and I was able to get three rows of my blanket done. I stopped after three because I was tired since I had been at this for multiple hours. But at least when I am ready to pick it back up this weekend, it should flow a lot faster. Continuing with one of my other posts, I have shown you each step I do. So The last thing I did previous to this week was Step 3: Ironing the squares. This week was Step 4: Lay out my pattern, Step 5: Pin squares/fabric together, Step 6: Line the fabric up with the needle and sew it by using the foot pedal and Step 7: Once a row was sewn together, continue on to the next way until all the rows are sewn together. Pictures are provided below for a visual on my steps. Also I have taken a time lapse video of me sewing a square - it is a little faster than I thought it would be so I may need to figure out a way to slow it down so you can see it a little better! I will try to put one up next week so you all can take a look at the process! Overall, I am super proud of my progress so far and I am very excited to see it all come together.
This week I was sick. I caught the bad cold that was going around and found myself lacking any motivation to do anything. When I tried to start sewing my blanket, I could not focus - my head would not stop hurting and nose would not stop running. So in short, I have no progressed at all this week.
Since I was unable to sew, I decided to read my sewing machine manual again (I had already looked at it once). The other thing I did this week was research different kinds of threads. In preparation for sewing, I was very confused as to which types of threads were best for my sewing machine and for my project. Click the following links if you are interested in some information on the differences between threads: LET'S TALK ABOUT THREAD: THREAD WEIGHT, FIBER TYPES, THREAD PROCESSING Different Types of Sewing Thread Different Types of Thread for Sewing (Video) That is all I have to report for this week. Next week I will have to do double time in order to make up for this week, but life happens and sometimes I just needs a break! So I am feeling better and look forward to getting this project started! |
AuthorHillary Mercier is a 4th Year Student at the University of Regina. She is currently studying to be a High School English teacher. Archives
April 2019
Categories |
 RSS Feed
